MS Office Word Importer for Polarion – how to
- Introduction
- Preparation
- Download the MS Word Importer extension
- Install Java on the machine that runs Importer
- Prepare the document for import
- Import the document to Polarion
- Import content of the document into Polarion
- Tips and Best Practices
By Nick Entin
1 Introduction
1.1 Objective and Target User
The MS Office Word Importer for Polarion (“Importer” ) migrates existing Requirements or other types of work items, described in a MS Word document format to Polarion. The Importer is targeted at Administrators, Business Analysts, and Requirements Engineers with Polarion user training as a pre-requisite.
The Importer allows requirements data currently in MS Office Word format to be imported into Polarion for reuse without needing to recreate them in the Polarion portal. The Importer follows these basic process steps:
- Recognizes MS Word document parts representing the work items (i.e. Requirements), and associated attributes such as descriptions, content, graphics, etc. to be imported.
- Establishes the mapping properties of the MS Word document artifact data to be imported to Polarion, mapping properties of the artifact to the Polarion model – e.g. setting the title of the work item, description and other attributes.
- Enables recognition of the MS Word document structure and reproduction of the same hierarchy in Polarion.
1.2 How this works
The principle of the Importer is relatively simple – each paragraph in the document represents potential work item or its attribute. Styles, applied to the paragraphs, allow recognition and mapping to the desired model.
This way, heading-formatted paragraphs could be mapped to titles of corresponding work items, and all text in between should go to description. Heading levels describe the parent-child relationship of the data objects. For instance, Heading 2-formatted text may be mapped to a child work item of the corresponding Heading 1.
It is also possible that style-highlighted parts of the text will be mapped to attributes of work item. For example, the name of a person is highlighted as “Author” style in document, and the name will be used as assignee of the work item during the import.
Naturally, every author likes to format his/her document with nice styling, applying company-branding and so forth. Therefore, before the Importer can process a document, it should be taught the applied styles and their semantics.
Importer is a Java application, connecting over Web Services to Polarion server. This means that the application will connect via HTTP/HTTPS protocol to the server, so the user must have a LAN/Internet connection to Polarion server during entire import, and must also have a user account in Polarion and be able to supply a valid user ID and password.
Parsing capabilities of the Importer are based on the open source project Apache POI (http://poi.apache.org/), and is itself an open source project. More details as well as link to the sources may be found here:
- http://extensions.polarion.com/polarion/extensions/extension.jsp?extension=PE-2
- http://community.polarion.org/polarion/#/project/Word/home
- http://community.polarion.org/polarion/#/project/Word/repository/browser (you have to be a registered Polarion user to authenticate – please follow the previous link and register yourself if you don’t have credentials yet.)
1.3 Prerequisites
The Importer can import binary documents, saved in MS Word 97-2003 format. If you use later versions of MS Office, you should use Save as > Word 97-2003 Document to convert it to an importable format.
The user who is going to import document should have an active account in Polarion an be able to supply a valid user name and password. Also, the account should be associated with a Polarion Requirements or Polarion ALM license.
As Importer runs as a batch application, the user should be have the necessary permissions to call programs from command line, and be able to create and update configuration files in a simple text editor such as Windows Notepad.
2. Preparation
2.1 Download the MS Word Importer extension
The importer is available at http://extensions.polarion.com/polarion/extensions/extension.jsp?extension=PE-2
Download it and extract e.g. to C:WordImporter (referred as from now on as “importer folder”).
2.2 Install Java on the machine that runs Importer
Importer requires the Java Runtime Environment (install Java 5 or newer).
2.3 Prepare the document for import
As mentioned before, you need to be sure it’s saved in Word 97-2003-compatible format. Run Save as…/Word 97-2003 Document if you’re using MS Office 2007 or a later edition.
This way the file extension will be .DOC, not .DOCX.
Copy the .doc file into the importer folder. For simplicity we’ll refer to the document as “input.doc” in the following steps. You may use even the document you are now reading as trial for your import 🙂
3 Import the document to Polarion
3.1 Prepare mapping for Polarion
Polarion should recognize structure of the document and be able to find our separate artifacts there (e.g. to find what constitutes a work item, the work item hierarchy, etc.). The Importer uses style tagging for mapping such entities.
For example: we may specify that every text styled as Heading 1 is the beginning of work item (so the heading text should go to the Title field of the work item), and text between this heading and the next one will be the work item. Description. If any text styled as Heading 2 is encountered after a Headin1, it should be interpreted as another work item with a child-relationship to the previous Headin1.
Importer supports extraction of Styles used, thus simplifying mapping.
Let’s execute the following command in the importer folder (prerequisite – actions from paragraphs 2.1, 2.2 and 2.3 are executed):
Java –jar WordImporter.jar input.doc input.doc.map –list
As result you should get new file “input.doc.map” in addition to your original document.
For convenience, the generated .map file includes comments, explaining how to configure mapping, the possible options, etc. This text is, of course, static. However at the end of the file there are generated statements, which are specific for your concrete document:
#Styles in file input.doc#style1=Heading 1

#style2=List Paragraph

#style3=Normal

#style4=Heading 2

#style5=TOC 1

#style6=TOC 2

#style7=TOC Heading

#style8=Title
The entries are commented, because now those styles can be reused in a “H<x>” section (mapping to the Headings) and in an “ignore” section (meaning to completely skip during the import).
3.2 Adjusting styles
Let’s open the .map file. Scroll till the end and check generated entries there.
The importer generates this default mapping…
ignore=TOC 1,TOC 2,TOC 3,Header,Footer,Copyright

H1=Heading 1

H2=Heading 2

H3=Heading 3

H4=Heading 4

H5=Heading 5

H6=Heading 6

H7=Heading 7

H8=Heading 8

H9=Heading 9
…which says following: All paragraphs, starting with “Heading 1” formatted title will be recognized as top-level elements, “Heading 2” will be recognized as subitems of “Heading 1”, etc.
There might be some cosmetic texts in the document, which should be ignored by the importer: for example, page headers and footers should not be interpreted, and they should simply be skipped by the processor. Those styles are listed in the ‘ignore’ section.
Please note that if you don’t list Header or Footer in the ‘ignore’ section, there is a danger that texts of headers/footers will repeat in every work item description that crosses the page border. As mentioned above, text between headings would be mapped to work item descriptions, and headers and footers between pages are also processed as paragraphs.
Those entries are just by way of example. You need to find what’s actually present in the document you intend to import. All styles used in the document are listed in the commented section at the end of the file:
#Styles in file input.doc#style1=Heading 1

#style2=List Paragraph

#style3=Normal

#style4=Heading 2

#style5=TOC 1

#style6=TOC 2

#style7=TOC Heading

#style8=Title
For our relatively simple document, we’ll create requirement type work items out of the styles Heading 1 and Heading 2:
H1=Heading 1

H2=Heading 2
The example document was saved from Word 2007 and there are two additional styles: “TOC Heading” and “Title”, which are non-relevant for the data to be imported, so let’s put these to the mapping:
ignore=TOC 1,TOC 2,TOC 3,Header,Footer,Copyright,TOC Heading,Title
As the result, the mapping file may look as following:

3.3 Simulate import, to make sure the mapping is correct.
Let’s try out import using the mapping file.
Run following command line:
java -jar WordImporter.jar “input.doc” “input.doc.map” –simulate
As result you should see simulate.html generated in your working directory. Open it in your browser and see if recognition of your items is correct.
4 Import content of the document into Polarion
4.1 Create a project
Log in to Polarion using a repository-level Administrator account and a create new project.
Remember the project ID and make sure that the “requirement” work item type is defined in the project. (You may import some other type of work item already defined in the project, but please specify the type ID in the command line parameter of the importer when starting it. More on this paramter lster in this document.)
You may want to consider creating and using a test project as the target for the first import run. This would allow you to repeat the import in case of any issues without disturbing your production project flow.
Start a new project as shown:

(Remember that you must have Administrator permissions for the repository or the project group in which the new project will be created.)
Please specify the location and ID of the project (e.g. “Sandbox/WordImport” as location in the repository and “WordImport” as project ID:

Selection of the Project Template is not especially important. Just choose a default one for the Polarion product you are using (Polarion ALM or Polarion Requirements):

NOTE: The above figure shows the default template selection in Polarion ALM.
Now let’s follow the wizard. Click Next to create the project after reviewing the Summary, and confirming project creation. Now we may want to redefine default Tracker Prefix (i.e. the prefix of each work item created in the project) – to make it unique, e.g. “WORD”:

TIP: Unique tracker prefix is important when there is the possibility of repository commits using external version control clients. If a work item ID is cited in a commit message, the commit is linked to the cited item. If the prefix is not unique, the commite could get linked to the wrong item in the wrong project, messing up your traceablity.
4.2 Create a Module as import target
We’ll demonstrate a more complex approach and import the document into a Module, a special container for structured sets of work items, which can later be used for versioning, inheritance or other operations on a group of work items. A Module merges the worlds of document-centric information and data-centric information.
Modules ensure that the structure of the work items they contain, and the way they are sorted, remains intact at all times. Therefore after import we should be able to recognize original structure of the document.
Let’s create a new module, give it a name, and enable Outline numbering without prefix:

After confirmation, you’ll be forwarded to the Home page of the new module, but there are no work items yet, so nothing interesting so far:

4.3 Run the importer
There are several additional options, you may consider before proceeding with the following steps:
- Possibility to create document root (i.e. a work item, which represents the imported document itself, thus content of the document will be linked below it in the structure)
- Possibility to import work items into a Module
- If you do not import into a module, what parent-child relationship you want to use (i.e. what link role to apply)
Those three parameters might be added to the command line. We’ll use the command line option to import into a Module and will not use the document root – this way we will get the same outline numbering as in the original Word Document.
Execute command line:
java -jar WordImporter.jar “input.doc” “input.doc.map” “http://admin:admin@localhost:81/polarion/ws/services/” WordImport requirement -module:”First Requirements”
Note: requirement in the command line refers to default type of work item to be used. This is a mandatory property of each work item, therefore a default has to be provided in the arguments.
Please check the URL and credentials for the Polarion server. In this example “localhost:81” is used to access Polarion server. Please replace it with the actual URL of your server. Also replace admin:admin with the username/password of the Administrator user, and specify the port number.
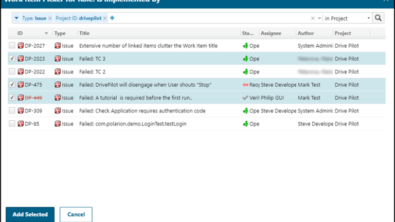
You’ll see messages about creation of particular work items in the console Window, similar to:
INFO   – Started processing root context.

INFO   – Skipping empty heading.

INFO   – Finished processing root context

INFO   – Started processing Workitem.

INFO   – Updated Workitem WORD-1

INFO   – Started processing Workitem.

INFO   – Updated Workitem WORD-2
How many times one work item might be updated depends on the number of attributes, so don’t be worried when the same work item is updated several times.
During WebService application, especially one sending a large amount of data, the server may refuse to confirm a commit immediately. WebService repeats requests until “ok” or “rollback” response is received. Therefore, don’t worry when messages like these appear in the console:
INFO   – Committing changes…

INFO   – I/O exception (org.apache.commons.httpclient.NoHttpResponseException) caught when processing request: The server localhost failed to respond

INFO   – Retrying request

INFO   – Commit finished.
These are not error messages, they are just info for the user that the operation is not yet confirmed by the server.
Now, when the Import is finished, you may return to the Polarion web portal and see the results:

Compare to the original Document:

If you switch to the Table view and set the Module view mode, you’ll find quick navigation just like a Table of Contents:

Compare to the Word document:

And one last screenshot on the imported content to demonstrate that the pictures are also imported along with text:

5. Tips and Best Practices
Use the importer prior to create Live Doc documents …
If you think you will want to work further in MS Office Word with the items from your original document, still having full Web UI access to the items through the Polarion portal, you may follow this process:
- Import the legacy document using Importer.
- Export from Polarion to a LiveDoc document (thereby converting storage to Word persistency)
- Continue to work with the data via the Polarion portal, or using Office 2003 Professional+ (LiveDocs are stored as XML files, which are supported only by MS Office 2003 Professional or more recent releases of MS Office).
Use the importer to ramp up quickly via reuse of legacy documents…
You can consider using the Importer to get old data into Polarion quickly. For example, you might write batch file that processes each document in a folder (e.g.
for %%i in (“*.*”) do run.bat %%i
Do not use importer as a frequent tool. If you need to maintain MS Word use LiveDoc documents…
The Importer does not update any information in Polarion – it just imports information and creates NEW work items. If you need to continue to work with the work items in a MS Office application consider using LiveDoc documents.
Limit importer use to trained persons…
The Importer supposes that the user knows some internal details of Polarion (e.g. Project ID, IDs of the custom fields, definition of the work item hierarchy, etc.). Also, the user should have sufficient permissions to import data. Please remember that deletion of created items is not supported – one can mark them as obsolete, or even delete them from Subversion, but there is no permanent deletion in Subversion).
Import to a Polarion sandbox project, verify integrity, then transfer to a Polarion project…
Related to the previous, to make sure that the importer works exactly as expected, it makes sense to try first with test project or module and only then import into the production environment.
Standardize MS Word document format to leverage common mapping properties…
The more straightforward the formatting of the source documents, the easier imports will be in the future. If several documents have similar formatting, application of the importer will be matter of seconds, and could be even automated.
When importing MS word embedded graphics …
The graphics will be transferred to standalone files and referred as images from the work item description and/or custom fields. However if you have embedded OLE objects, those are not supported by browsers and will be replaced by placeholders. Importer doesn’t really care about the type of the embedded image – if your browser supports the type, you’ll see the image in the GUI, if not – just a placeholder.
When importing MS Word tables, or spreadsheets, ….
Importer converts Word formatting to HTML, so there might be some lost of information on transferring tables –row or column spans, for example.
Switch off notifications during the import…
Importer creates work items in the system. Depending on the notification and autoassignment configurations, your users might be notified about the creation of the work items. Import could potentially cause quite a lot of emails to be sent out if there are many items, or if your configuration notified many people about new item. You might consider temporarily disabling notifications in your Polarion configuration before running Importer.

Editor’s Note:
This how-to was written by Nick Entin, VP for Research & Development at Polarion Software. Nick oversees the development of all Polarion requirements management, application lifecycle management, and team collaboration software products. He is a member of the Scrum Alliance and a Certified ScrumMaster. You can read his profile at http://www.polarion.com/company/people/index.php.